Soap bubbles and thin-film interference
Thursday, October 1st, 2026 at 05:54pm
The latest item to cross off my list has been to photograph soap bubbles, specifically the patterns and colours that form on their surface. This has been fairly tricky to work out, but I ended up with a setup that worked for me.
With so much variance in the results I ended up with a lot of images and struggled to limit my final selection, so here is a gallery with sixty images: Soap bubbles
This was the setup on my kitchen bench:
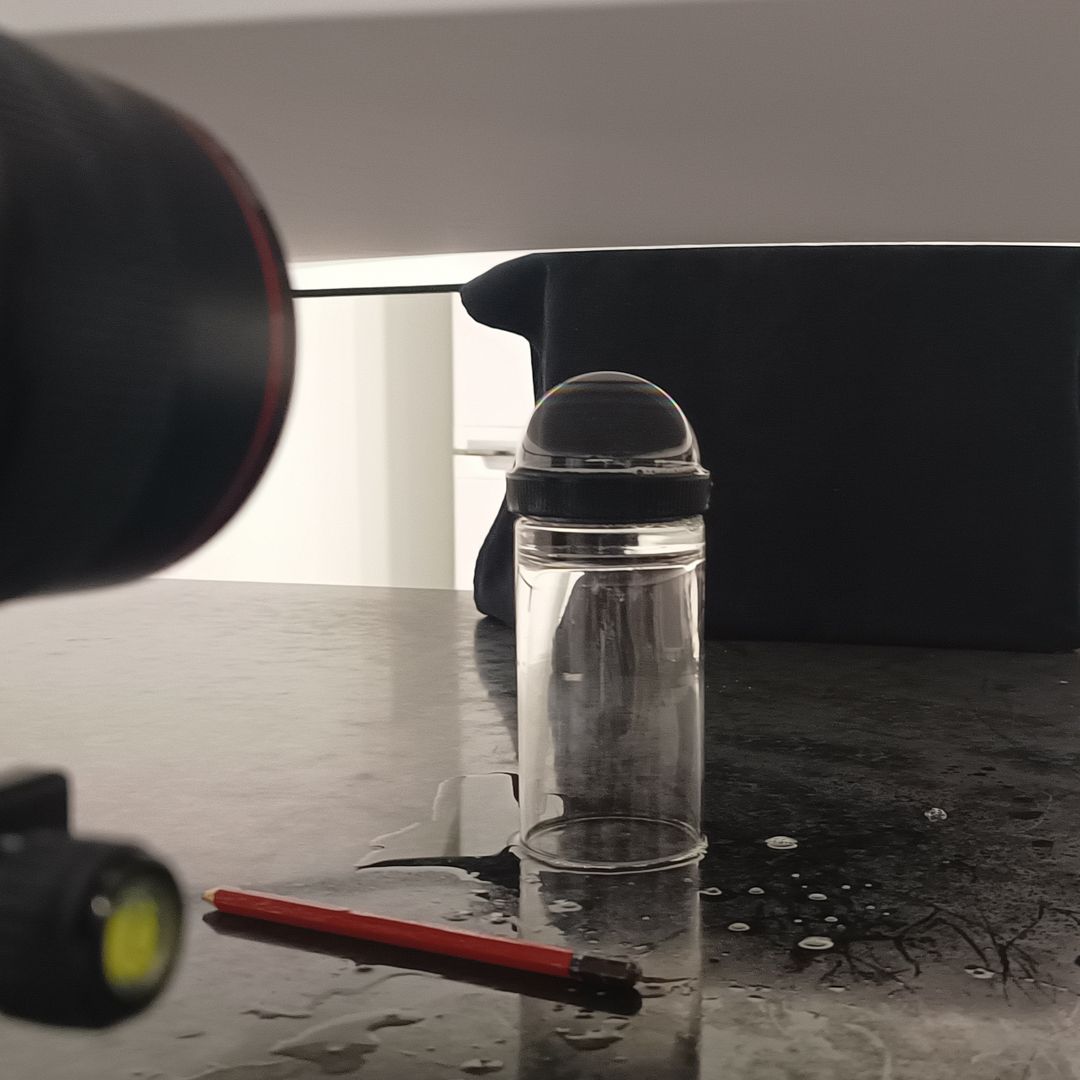
The progression of a bubble is reasonably predictable:
- bands of colour will appear at the top of the bubble and slowly work their way down
- if you disturb the bubble (eg blowing gently) then you can mix up these bands, creating patterns or mixing across the whole bubble
- the bright purple and blue will give way to a gold
- eventually holes will appear gradually increasing in size
- at any stage the bubble might just pop, so you start again…


- Soap solution
- There is no consistent recipe for a good soap solution, all I know is that what I used has dishwashing liquid, glycerine and water.
- Dish
- The container you use to hold the bubble needs to be round and black, the suggestion of of a lens body cap worked out well for me.
- Light
- Have your largest smoothest light diffuser as close as possible to the bubble. I used one of those round springy ones. Initially I used a softbox, but the creases in its front diffuser would show up.
- If using flash as I did, then have plenty of rechargeable batteries ready to be swapped over.
- Blowing
- Many videos show using a straw to blow and then manipulate the bubble. I had a length of aquarium air tubing which I used instead, it was much easier to only reach my arm into the small gap between the bench and the diffuser.
- Focus
- Place a pencil or similar object on your dish where the front of the bubble will be and manually focus on that. If you focus on the centre of the dish, only the edges of the bubble will be in focus.
- Exposure
- As I was using flash the shutter speed was at 1/250. I tried between f/11 and f/22, settling on f/16 at ISO400.
- Patience
- Be prepared to blow a bubble, gently manipulate it and constantly take photos, then repeat…


In my final session playing with this technique I took over two thousand images, these were culled to eight hundred, and then I narrowed them down to the sixty. All the images have a boost to the exposure and clarity, as well as being cropped and rotated in some way.
The videos I found useful for this technique:
- Abstract macro tutorial: INCREDIBLE images at home (inc lighting, settings, LR) – YouTube
- Bubble film photography: How to successfully take creative macro photos of a thin film of bubbles – YouTube
- Bubble Photography – Second Attempt – YouTube
- Bubble Photography | How to Shoot awesome Bubble Photography & Videos at home! – YouTube
- Creative Photography Ideas at Home – Bubble Photography. – YouTube
- Macro bubble photography – YouTube
- Quarantine Home Photography ideas. Bubble Photography and how to capture them at their best! – YouTube
- Soap Bubble Photography | Photography Projects to do at Home | Stewart Gibbs – YouTube
- Soap Bubble Photography Tutorial Pt.1 [Basics, Lighting, Photographing] – YouTube
Tagged with: photography

