Blog entries tagged with "lightroom"

A GPU for Lightroom

Sunday, December 18th, 2016 at 11:57am

In the four years since I last upgraded my windows desktop the only hardware change was that I had added hard drives for additional storage. On the software side it is also similar, except newer versions (Windows 10 instead of Windows 7, updated browsers, Lightroom CC and Photoshop CC, etc).

In mid 2015 when Lightroom introduced the ability to use the GPU my initial experience was negative as it broke the develop module. It was detecting the GPU in the onboard video, but was failing to use it properly. It turned out the solution was to install the Intel drivers instead of using the generic Microsoft ones. At the time there were people saying that unless you had a really high resolution display that you shouldn’t bother enabling the GPU, I didn’t notice a different either way so I left it enabled.

I don’t make panoramas that often, but I was glad that there is now merge functionality built into Lightroom, except when it fails. There was one panorama I was trying to merge earlier this year that would fail with an internal error, but it would succeed with the GPU disabled. I only had the default amount of memory allocated to the GPU, but increasing it didn’t help.

I haven’t played games for a long time so the onboard video was sufficient, but a small part of me started to wonder whether adding a graphics card with a decent GPU would be worthwhile. It doesn’t need to be a fancy gaming card, just something better enough than the onboard video.

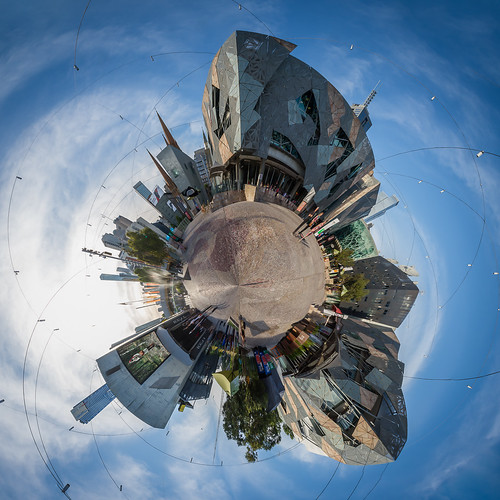
Last Monday I went along to a Canon Collective workshop that was about shooting panoramas to make into little planets:

Federation Square

When performing the initial merge I found that it would again fail when using the onboard GPU, and then when the GPU was disabled Lightroom would max out the CPU and RAM, failing about half the time. So yesterday I picked up an Nvidia GTX 750 Ti graphics card, the second cheapest card available at local stores, but still rated around 450% better than the onboard GPU.

I don’t notice much difference while adjusting images, but based on what I see in task manager it is using less CPU and memory. However there is a big difference when merging images into the panorama. Where before it would take 15 minutes and all available memory, the same merge now takes around 3 minutes and about half the available memory. So a useful improvement.

The other thing that came out of the panorama workshop was the benefit of a tripod head that lets you pan independently of tilt. The Manfrotto 486RC2 ballhead that I use has one locking action, so to pan I used the kludge of rotating the tripod column. This isn’t ideal so on a whim I checked ebay, within 24 hours I had upgraded the ballhead to the (now discontinued) Manfrotto 488RC2 ballhead. This also came with a spare quick release and plate, which I believe I can use to make an L bracket, which will be a post for another time…

Tagged with: , , , ,

I like automatic perspective correction

Monday, June 2nd, 2014 at 11:11pm

As a rule I try to avoid spending too much time post-processing my photos which is why I have been generally satisfied with the simple (compared to full Photoshop) adjustment tools within Lightroom. There are of course the occasional exception to any rule.

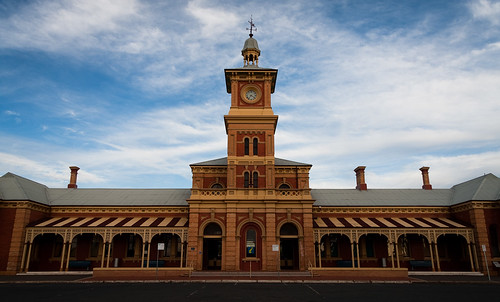
I have mentioned before about how I went from this (as-shot) image of the Albury train station:

Grand old station

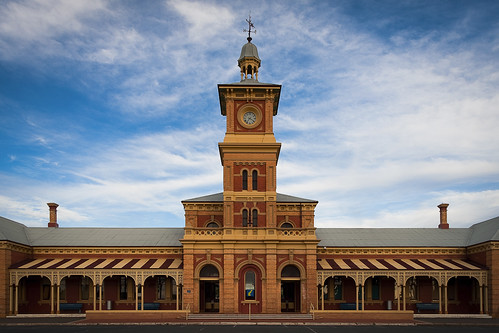
to this brightened, sign and chimney removed, and perspective corrected image:

Grand old station (modified)

What I said in the previous post wasn’t quite correct, I actually cloned out the signs and added a gradient before I decided to try to correct the perspective using GIMP. I recall that this took about an hour to figure out how to do, then the image went back into Lightroom to clone out the third chimney and some final tweaks.

That was two years ago. Today in version 5 of Lightroom is a perspective correction tool. You don’t have full control to change the perspective, instead it is a couple of correction settings that work in an automatic way. Since it was introduced it has been a very handy tool.

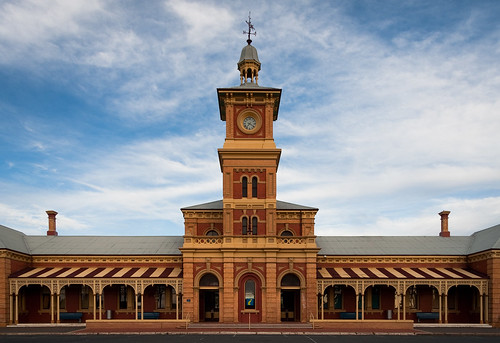
I don’t know why, but a few days ago I thought of this image and wondered how the built in perspective correction would do. So I went to the original image in the Library (ie all the edits up to the point it was exported to TIFF for GIMP), made a virtual copy, clicked the ‘Vertical’ perspective button, recropped and then cloned out the third chimney to arrive at:

Grand old station (modified 2)

If you open both modified images and swap between them you can see that the only difference is a slight difference to the proportions of the building. But when you consider one was a few seconds to click a button while the other was at least an hour and then the change history is split across two files, I am glad that Lightroom now has built in perspective correction.

I am also hoping that over time the perspective correction tool is expanded into something like the Adaptive Wide Angle filter from Photoshop. While I am wishing for things, I would also like Lightroom to get content aware fill…

Tagged with: , ,

A little bit more on that false dichotomy

Wednesday, May 28th, 2014 at 02:30pm

I was sorting through some old files (yes, a lot like xkcd 1360) and I came across a PDF of a getting started guide for Lightroom. It is old (version 1.1) but while skimming through it I noticed this overview of the workflow:

Lightroom workflow overview

The particular thing that caught my eye was the blue “Export to Photoshop” circle to indicate that Photoshop is not the end point, this is what I was saying in my recent post about the false dichotomy between Photoshop and Lightroom.

Tagged with: , ,

Some Lightroom things

Saturday, May 10th, 2014 at 11:28pm

Performance

Back when I last upgraded my desktop I made the choice to put my “todo” photos on the SSD which I thought gave a significant speed improvement. I was wrong and over time I came to realise that the real speed improvement was on existing images, not any of the new images, they still had a small ‘Loading…’ delay.

Once I got around to looking into it I found the Lightroom Help / Optimize performance page which is a good starting point. These other 10 tips were also helpful.

Apart from tweaking settings such as the preview size, the biggest change to my process is that I intentionally render 1:1 previews. These previews are stored in the cache which is on the SSD. As the photos didn’t benefit from being on the SSD, all my photos are back on to a single drive (a WD Black so decent speeds) which benefits my import process and also the “todo” to “done” move of the photos.

Lens correction by default

A few months ago I started to apply lens correction and removal of chromatic aberration to all of the new photos. For a while I would do this by going to the first image in the import, checking the two boxes and then syncing the settings to the other images.

To automatically turn on the correction there seems to be two common methods, create a preset to use when importing or to change the default develop settings. As I don’t actually use the import workflow I opted for the latter, so from last week any image taken with a Canon 7D will have correction applied.

Convert to DNG

Whether or not to convert RAW files to DNG is one of those questions with no clear answer. Hence why I currently use RAW files, but as an experiment I will convert the photos from my next outing into DNG.

I expect to get a small (but it will add up) benefit from the slightly smaller file (around 2MB per), but the main benefit should be the embedded fast load data. Time will tell…

Tagged with: , ,

The false dichotomy of “Photoshop or Lightroom?”

Saturday, May 3rd, 2014 at 11:52am

If you are talking about photography post processing (be it in a camera club or online) then it is inevitable that you will be part of a debate about whether you should use Photoshop or Lightroom. As there is no simple answer don’t be surprised if things get heated.

The flaw in these debates is that Photoshop and Lightroom are not alternatives for each other. While Photoshop is a massively powerful image editor, you don’t use it to manage your photo library. On the other side while Lightroom has a great library module and gives many adjustment options, it is not an image editor.

So Photoshop and Lightroom and not alternatives, they complement each other and that shows through in how they integrate together. If you need to do something that is beyond the adjustments built into Lightroom then you can take the image out to Photoshop (or other program) and then bring it back to Lightroom for exporting or printing.

Keeping within the realm of Adobe products, instead of comparing Lightroom to Photoshop, the valid comparison is Lightroom against the combination of Bridge and Camera Raw.

So what is the harm in arguing over Lightroom or Photoshop? Apart from the time that is wasted, it can also provide incomplete information to the inexperienced photographer. This may have a greater negative impact in the long run.

What do I mean? Well, at the camera club we want to encourage beginners to be out there taking photos and submitting them in our monthly competitions with the critique feeding back into better photos in the future. To me this includes talking about concepts and effects, not the specific steps in a particular tool.

I have seen an experienced photographer demonstrate to a beginner how to add a vignette to a photo via a complex series of steps (selection, feathering, new layer, fill, opacity blending, etc) in Photoshop. The same vignette could be added in Lightroom (or Camera Raw) by moving a slider which means that the beginner could take in more about why to use a vignette than how to apply it.

My view is that a beginner should start with Lightroom to manage their photos and apply adjustments. It is only once they are much more experienced and are pushing the limits of the Lightroom adjustments that they should consider Photoshop. And don’t forget that taking the right photo in the first place is better than fiddling with post-processing.

Tagged with: ,

A hardware refresh

Sunday, October 7th, 2012 at 11:18pm

Four and a half years ago I upgraded my home Windows desktop. Since then I had added RAM, switched to Windows 7 and replaced the hard drives, however it was still the same computer and was perfectly fine for most of my needs.

But not all, so for a while I had been thinking it was time for an upgrade.

One example of a frustration was the delay of around 10 seconds when loading an image for editing in Lightroom. This was only made worse by my upgrade to the Canon 7D earlier in the year, instead of loading a 10MB RAW file, it now had to load a 20MB raw file. I had been monitoring the disk and CPU usage, and it was clear that this activity was CPU bound.

Given this and some other specific performance issues (plus the feeling that after four years it was due) on Friday I bit the bullet and picked up a replacement motherboard, CPU, RAM and power supply to put in my existing case with my existing hard drives.

So far I have only described a like for like swap of components, with the biggest change having multiple monitor output built into the motherboard. There was one other change which has possibly given the greatest performance improvement: adding an SSD to the mix.

In order to best use the SSD (but without any automatic cache type usage) I changed where I store my data. On the SSD I have:

  • Windows
  • Firefox profile (with its browsing cache)
  • Lightroom catalogue (and its cache) and my “todo” photos.

With this setup Windows only takes a few seconds to load, Firefox loads almost instantly, and (most importantly) opening Lightroom and editing photos is now quick with the 10 second delay gone. Hopefully this will last me for another four years.

Tagged with: , ,

A heavily worked image

Wednesday, May 2nd, 2012 at 08:40pm

Two years ago I took this photo of the Albury railway station:

Grand old station

However the version I submitted in the May competition at the camera club was the result of a few hours of processing, the most processing I have ever done to an image:

Grand old station (modified)

I first took the image out of Lightroom and into GIMP where I “corrected” the perspective. You know, to make the verticals vertical. I also stretched it vertically because it was looking a bit squashed.

Once back in Lightroom I began to liberally apply the spot removal tool to remove the parking signs and one of the chimneys, the goal being to make the image symmetrical. My final changes were to add a gradient to bump up the exposure of the bottom half and an overall change to the levels.

I entered the image as a print, which the judge awarded a highly commended.

I also recieved highly commendeds for two other images, both from the Perth road trip and both entered as EDI. First was this image of the red earth and blue skies near Marvel Loch:

Red and blue

Second was this image of water pooled on some rocks in the desert:

It rained recently (modified)

This second image was also modified from when I first posted it to Flickr, it is a different crop, contrast has been increased and a gradient applied to the sky to bring out the clouds.

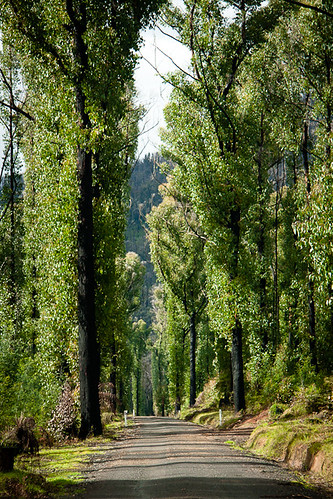
My final image featured the regrowth on the trees near Marysville, burnt in the Black Saturday bushfires:

Regrowth

Tagged with: , , ,