Blog entries tagged with "3d printing"

Sensors in my garage

Wednesday, December 18th, 2024 at 08:10pm

For a long time I have been intending on monitoring the state of my garage door with my original idea being to use microswitches on the opener mechanism to determine the fully open and fully closed positions. I couldn’t work out a good way to mount the switches so over the years I have considered other options such as a wireless tilt sensor attached to the door.

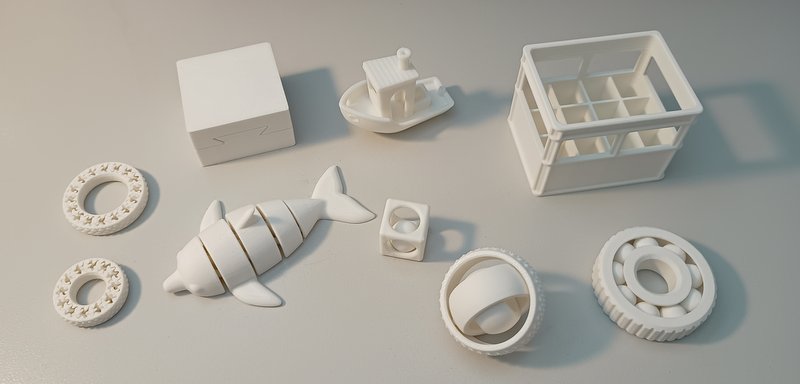
Now that I have a 3D printer I realised that I was now able to design a custom bracket to hold the microswitch:

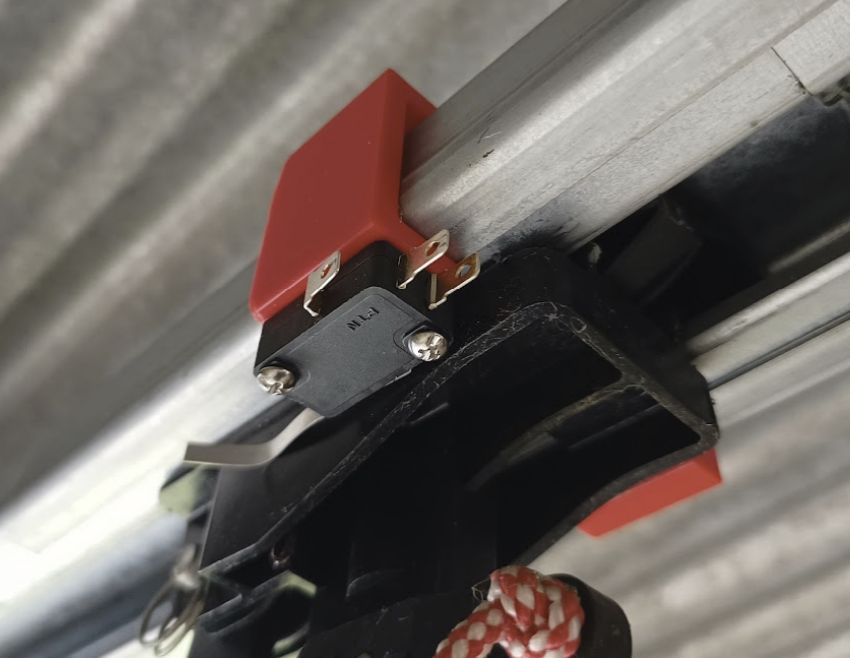
The clips over the rail for the garage door opener to hold the microswitch against the side of the carriage that is attached to the door. I am using microswitches with long arms that I bend to make sure they cleanly slide along the carriage.

Originally I wrote some code for an arduino to send the status of the door over mqtt, but recently I have been playing more with ESPHome. It doesn’t have the same satisfaction as writing it from scratch, but it sure is a lot easier and quicker.

The two microswitches are set up as binary sensors, which update the status of a template cover:

cover:
  - platform: template
    name: "Door"
    id: door
    device_class: garage

binary_sensor:
  - platform: gpio
    id: door_open
    pin:
      number: D1
      mode:
        input: true
        pullup: true
      inverted: true
    filters:
      - delayed_on_off: 10ms
    name: "Door open"
    on_press:
      - cover.template.publish:
          id: door
          state: OPEN
          current_operation: IDLE
    on_release:
      - cover.template.publish:
          id: door
          current_operation: CLOSING

  - platform: gpio
    id: door_closed
    pin:
      number: D2
      mode:
        input: true
        pullup: true
      inverted: true
    filters:
      - delayed_on_off: 10ms
    name: "Door closed"
    on_press:
      - cover.template.publish:
          id: door
          state: CLOSED
          current_operation: IDLE
    on_release:
      - cover.template.publish:
          id: door
          current_operation: OPENING

Over the years I have seen other open source projects for garage doors such as OpenGarage which uses an ultrasonic distance sensor to detect the door position. I don’t like this for door position as I have a single panel tilt door and a distance sensor could tell me if the door is open, but it can’t detect if the door is only slightly open.

But it did get me thinking because another use of the distance sensor is to detect the presence of a car. I picked up some 3.3V sensors (for better long term compatibility over the 5V type) and ESPHome made it simple to add a distance sensor and then a template sensor that uses that distance to know if my car is there or not. It is 2.3m from the sensor to the floor, or 0.9m from the sensor to the roof of the car.

sensor:
  - platform: ultrasonic
    trigger_pin: D5
    echo_pin: D7
    timeout: 4m
    name: "Ultrasonic Sensor"
    id: ultrasonic_sensor
    update_interval: 10s
    filters:
      - filter_out: nan
      - median:
          window_size: 10
          send_every: 6

binary_sensor:
  - platform: template
    name: "Car"
    device_class: presence
    icon: mdi:car
    lambda: |-
      if (id(ultrasonic_sensor).state < 1 && id(ultrasonic_sensor).state > 0.8) {
        // car is in the garage
        return true;
      } else {
        // no car
        return false;
      }

As is my habit I also included a temperature sensor and then wired it up on a protoboard. To mount it to the garage roof I 3D printed a simple bracket:

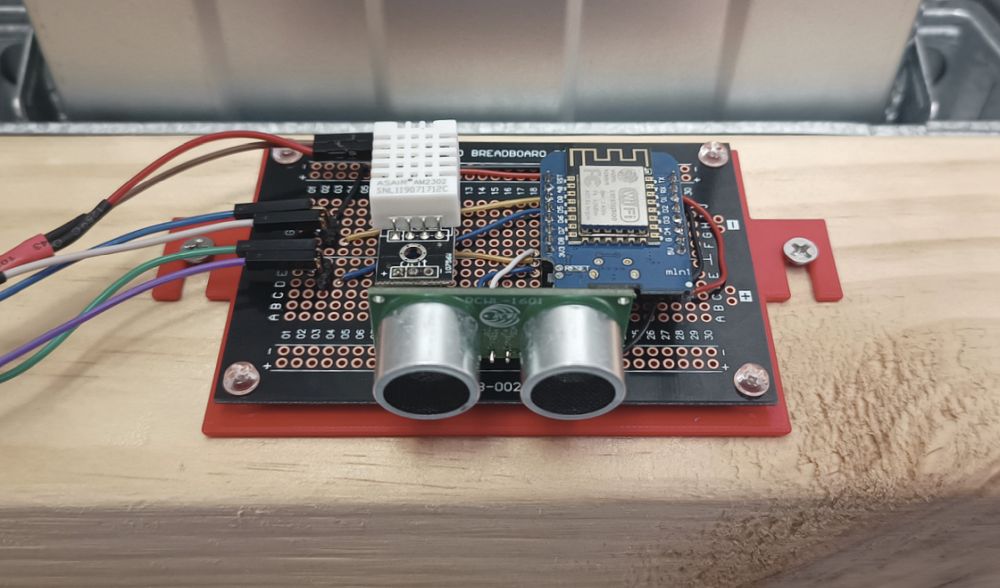
You may notice that I am not controlling the door. That is because I am only interested in monitoring, I don’t want or need remote access to open the door.

Also with the D1 mini I think I am out of suitable IO to control a relay. Some of the outputs are not stable at boot so shouldn’t be used to control a relay, and those are the best ones to use for the ultrasonic and temperature sensors. Of course this is an issue that is easily solved by upgrading to an ESP32, but before I consider that I need to tidy up the wires and connect them better, possibly designing a custom PCB to hold these components.

Tagged with: ,

Using heat set inserts to improve my IIGS

Thursday, August 1st, 2024 at 08:09pm

It has been over a year since I last tinkered with my Apple IIGS and I still hadn’t sorted out a better solution for connecting a USB drive to the CFFA3000. Having a USB extension cable hanging loose out the back of the case is functional, but not elegant.

On the CFFA3000 is a USB type A socket, but next to that is a row of holes that could take pin headers. I have a number of old USB brackets from old computers which plug in to that style of header. After a few minutes soldering I now have a USB socket on a short cable that is intended to be mounted on a case.

Unfortunately none of the existing port locations on the back of the IIGS are the right size. Though I now have a 3D printer and have just learned about heat set inserts:

I drew up a simple design in FreeCAD and then used my soldering iron to set the brass inserts. Next I need to find a small USB drive which doesn’t stick out too far from the back of the case.

Tagged with: ,

My first Benchy

Sunday, July 14th, 2024 at 03:58pm

Ever since I first heard about 3D printers I was intrigued, but not interested enough to delve into that low level of hardware tinkering. Over the years I have noticed that they have shifted from being a project in themselves, to being a tool to use for other projects. However it is only in the last six months or so that I have seriously considered getting one as a way to improve my home automation projects.

Every two weeks at work we have someone give a presentation on something that interests them, it does not have to be work related so there have been all sorts of talks. Earlier in the year I gave an update on my home automation, but last Friday the topic was how to get started with 3D printing.

That night I placed an order, the printer arrived on Thursday and within an hour I had my first Benchy:

Small 3d print of the Benchy benchmark

In that talk and other places (blog posts, youtube videos) there were essentially two brands to get started with: Creality or Bambu Lab

At first I was leaning towards a Creality Ender-3 as I liked the open source design and the flexibility that would give. However the large number of different models was a bit overwhelming and while I could tinker with the setup and software, I was leaning towards wanting the printer to be a tool…

This means that despite the closed source design and the default printing flow using a cloud service, I opted for their cheapest and smallest option which is the Bambu Lab A1 mini. The print bed might be small, but it should be big enough for anything I have planned (brackets to mount sensors, small cases for projects) and I did not get the AMS as I do not plan to print in multiple colours (and that almost doubled the price…).

In the end I paid $428 to get the printer and three spools of filament. Obviously this is a price I was happy with, now that the printer has arrived I appreciate how compact it is and how it fits down the end of my desk.

So far I have played around with printing a few widgets from designs available online:

Various 3D printed widgets

I have only encountered two issues while printing these, one maintenance and one design.

For the later prints I found that the print would fail to adhere to the plate and a blob of plastic would form around the print head as it continued to print further away from the print bed. I have only been using one side of the plate and I have not cleaned it. So the solution might be as simple as following the instructions to clean the plate using dish soap and a microfibre cloth. I should also keep an eye on the print at the beginning to make sure it starts ok.

The design issue is that when the prints complete the print head is raised up away from the print, but due to how the filament tube is mounted this also draws filament off the spool. Then once the next print starts the is excess slack in the filament and it has been slipping off the side, then later jamming. One of the suggested mods I have seen is to print a handle that also doubles as a spool relocation. With the spool up higher the filament tube is in a different location that does not move with the print head, so it would not cause this excess slack. I don’t know if I will do this, or if I will try to remember to check that the filament will come off the spool ok.

My next step is to start learning how to design objects to print, with my first project being brackets to mount microswitches to the track of my garage door opener. I have had the software side of that ready for a long long time, but I was stuck at attaching the hardware.

Over the last week I also designed and ordered my first custom PCB (more on that later), these two techniques open up a number of possibilities…

Tagged with: