Blog entries tagged with "geotagging"

GPS tracks and tall buildings

Saturday, July 30th, 2022 at 09:21pm

Today I was in the city for the first day of Open House Melbourne and I have just finished geotagging the photos. My approach of shooting both JPG and CR3 so I could use the JPG for geotagging worked out ok.

I did use gpsPhoto.pl to tag them all and while I expected the photos taken indoors to either not have a found location or to be in the wrong location, I had forgotten how bad a GPS track around a lot of tall buildings could be:

This is a screenshot of Google Earth showing in blue the result of the GPS track, while the orange lines are indicating the path I actually took.

When I manually correct the locations on the images I am not trying to be too precise, within 5 metres maybe 10. Close enough that if you go to that location you should be able to look around and see the thing or perspective I was taking a photo of. An error of a few hundred metres might not matter much for a landscape out in the country, but in a dense urban environment I want to be close.

Tagged with: ,

In need of a new geotagging tool

Monday, July 25th, 2022 at 08:08pm

In my previous post I mentioned that I had a problem with geotagging the CR3 files from my new camera, this is that story…

I geotag most of my photos, both so that I have a record of where it was taken and so that when I share the photos (such as to Flickr) that others can also see where they were taken. Part of my trip planning is opening up the Flickr map to the areas I am going to and doing a search.

When I started geotagging the map module in Lightroom wasn’t that good, while I understand that it is a lot better now I still want to geotag before I load the photos into Lightroom so I can be sure that the files themselves are tagged, not just locations stored in the Lightroom catalog.

Two tools have served me well:

  • gpsPhoto.pl – a commandline tool written in Perl (which I know quite well) to geotag the image files based on a GPX track
  • GeoSetter – a free windows program that I like for manually placing images on a map or correcting the location when the GPX track isn’t quite right (eg like it does when the GPS signal reflects off tall buildings)

gpsPhoto.pl is working perfectly, it is Geosetter where there are some problems. The program hasn’t been updated in a number of years and while it still works the Google Map is covered by a “For development purposes only” watermark. The more recent and relevant issue to me is that being old it does not have support for the CR3 format that the R6 uses. Because of this I spent around three hours looking for a replacement for Geosetter that supported CR3 files. It turns out there are very few free options and I couldn’t get any of them to work. The most promising one specifically listed support for CR3 files, but then all I could get it to recognise were JPG files, it didn’t even support CR2.

In the end I was able to geotag the photos I took at the MSTEC National Steam Centre and while it was a workaround it is possibly also an indicator of what my new process might have to be.

I had 350 images to manually geotag and I could have taken the easy way out of using exiftool to tag them all with a single location (eg the front gate), this is the workaround I came up with:

  • temporarily load all the CR3 files into Lightroom
  • export them all as JPG with the same names
  • use Geosetter to tag all of the JPG files
  • run a script that copies the GPS tags from a JPG (eg IMG1234.jpg) to the corresponding CR3 (eg IMG1234.CR3)
  • sort the tagged CR3 files into their date/time based folder and sync into Lightroom

This worked and means that for now (possibly forever…) I have changed the R6 to save both JPG and CR3 images, using the JPG for the geotagging and then only storing the CR3 files long term. Although gpsPhoto.pl will happly geotag the CR3 files, I will still tag the JPG files first because I use Geosetter to confirm (and fix) their locations.

Tagged with: ,

First drive without a mirror

Sunday, July 24th, 2022 at 10:24pm

I mentioned that my plan for the weekend was to get out with my new camera so today I headed down to the MSTEC National Steam Centre. It would have been better to go on a day when the engines were running, but I knew that there are plenty of interesting machinery to photograph, even when stationary.

I went light, just the R6 with 24-105mm and also the 16mm because even though I expected better low light performance than the 7D I knew that the f/2.8 would be nice when trying to get close ups indoors.

The first difference I noticed was due to the articulated screen as I am not sure if I want to have it facing in or out. I am so used to chimping after every shot so that means it should be out, but then it is always on unless I have my eye to the viewfinder. If I have the screen facing out I need to see what I can turn off with the touchscreen so I don’t accidentally change settings.

The next thing I found was that I am used to pressing the focus/zoom button on the 7D to zoom in when reviewing images. But on the R6 this is just a focus select button, you zoom with the horizontal wheel. A few times I realised that I had changed the type of focus points… will I learn to not use that button or should I customise so it is no longer focus select?

A big change is needed when I change lenses. As the 7D is a DSLR, when the camera is on not much is happening you can look through the viewfinder whenever you want and have the camera focus on something, it is only when you take a shot (or turn on live view) that the sensor is exposed. Although not quite the best practice I haven’t had issue with simply detaching one lens and attaching another one, the sensor is projected by the mirror and shutter. However with the R6 there is no mirror and the sensor is always on to capture an image for the viewfinder or display screen. I have it set so then when you turn the camera off it will close the shutter, but if I simply detach the lens then the sensor (that nice big full frame sensor) is fully exposed and as there is no mirror it is really close to the lens mount. I must re-train myself to turn the camera off and wait for the shutter to close before switching lenses.

None of what I have mentioned so far is a problem as I will need to adjust to having a new camera, however something that has now sucked up a few hours of my time is that so far haven’t been able to geotag the images I took today. I didn’t take my GPS with me as I expected that most of the photos I took would be indoors and a GPS track inside a metal building is never good. So I was fully expecting to have to manually geotag the images at home. I have previously described my geotagging process but all I will say for now is that I haven’t been able to find a tool that will work with CR3 files.

Overall it was a good day as I learned about this camera and how have a challenge in regard to geotagging…

Tagged with: , ,

Losing track of time

Sunday, August 25th, 2019 at 10:15am

At the time I posted about the GPS Week Number Rollover my Garmin eTrex Vista HCx would still work, just with a date that was 1024 weeks too early, but then it stopped recording a timestamp at all which made the track useless. I found this out the hard way when I got home after taking photos that the GPX file for that day couldn’t be used. I was able to recover the track for that day from the device memory using the Garmin software, but that is a hassle to do on a regular basis.

So I ended up doing what I predicted, I picked up a Garmin eTrex 20x which is an updated version of what I had.

Although I don’t plan to use it for mapping, just in case I loaded on maps for Australia created from OSM data. I initially put these on a microSD card, but later loaded them directly into the device.

With the older device I had it configured to automatically write the track log as GPX to the microSD card, so at the end of the day it would be quick to pop off the back cover, pull out the microSD and insert it into a card reader.

This approach was not going to work with the new device.

First the microSD card is not as easy to access. It is below the batteries (not that much as an issue as I would swap the batteries at the end of the day anyway) but it is not in a spring loaded push slot, instead it is under a sliding cover and awkward to extract.

The main issue however was that I couldn’t work out if I could configure it to write automatically write a GPX log. I did find that I could save the current track (resetting the track at the same time) and then if the device was in USB mass storage mode find the GPX file of that saved track.

So it looks like my new geotagging process will now include:

  • at the start of the day:
    1. when I take the sync shot of the GPS time, also clear the current track
  • at the end of the day:
    1. save the current track
    2. plug the device in via USB
    3. browse to the GPX folder
    4. copy the GPX file with the saved track

Tagged with: ,

GPS Week Number Rollover

Saturday, July 27th, 2019 at 07:42pm

A quirk of the GPS system is that it uses a week counter to represent the date, this can only represent a maximum of 1024 weeks, so every ~19.7 years it resets to zero, known at the GPS Week Number Rollover.

The second rollover was earlier this year and there was plenty of media coverage as well as government statement at the time. I also saw a number of YouTube videos about it, such as this one from Matt Parker:

The handheld GPS unit I use for geotagging photos is from Garmin, so I was particularly interested in what they had to say about it. Well that is non-specific… is my device (obtained second hand twelve years ago and last firmware update was ten years ago) part of the “vast majority” that “will handle the WNRO without issues”?

I wasn’t that concerned so opted for a wait and see approach, so when I used it in late April I was pleased to see that it was logging the correct date. However when I used it in May and June I noticed that there would be spurious log files, as if it was starting up with the wrong date and then adjusting to be correct.

Today was my first time heading out to take photos since June, so I was disappointed to find that my GPS device is now stuck in 1999. The location and time are correct, just the date is wrong.

When geotagging my photos from the GPS track I would specify the time offset between the camera (local time of where I was) and UTC, so for Melbourne at UTC+10 that is an offset of -36000 seconds. Since the date it is logging is now 1024 weeks out, I could specify an additional offset of -619315200 seconds…

The more reasonable option is to look for a new GPS unit, but with my key requirements of AA (or AAA batteries) and a GPX file written to an SD card I suspect that I might just end up with a newer version of what I have. I have seen some nice small dedicated GPS logging devices, but I want to be able to easily swap in fresh batteries or don’t want to be forced to use their software to access the tracks.

I had a quick look at eBay to get an idea of what might be available, saw plenty of devices like what I already have, but don’t see any mention of GPS Week Number Rollover in the item descriptions…

Tagged with: ,

My travel photo workflow

Tuesday, February 5th, 2019 at 09:28pm

I’ve been sitting on this post for a while (first started while in San Francisco) so my trip around the South island of New Zealand is a good time to get it finished. Upon reflection it is pretty much the same…

Equipment:

  • Camera – of course
  • GPS – I have a Garmin eTrex Vista HCx that is intended for bushwalking, but I just use it to log
  • Computer – A small windows laptop with Lightroom and other tools

During the day:

  • Take photos, lots of them
  • Have the GPS on and always keep it near the camera
  • Take a photo of the GPS device showing the current time

Each night:

1. Copy photos and GPS track

Once I am settled down for the day and have the laptop out I start to copy the photos from my Compact Flash card (or cards if a big day) into an ‘incoming’ directory.

As copying the photos can take a while (though not as long now I used a USB3 card reader) I leave that running and copy the GPS tracks (in GPX files) from my GPS device. I used to to put my GPS device in mass storage mode to access the microSD card via a USB cable, but these days I pull out the microSD card and put it into the card reader.

2. Check GPS track and photo times

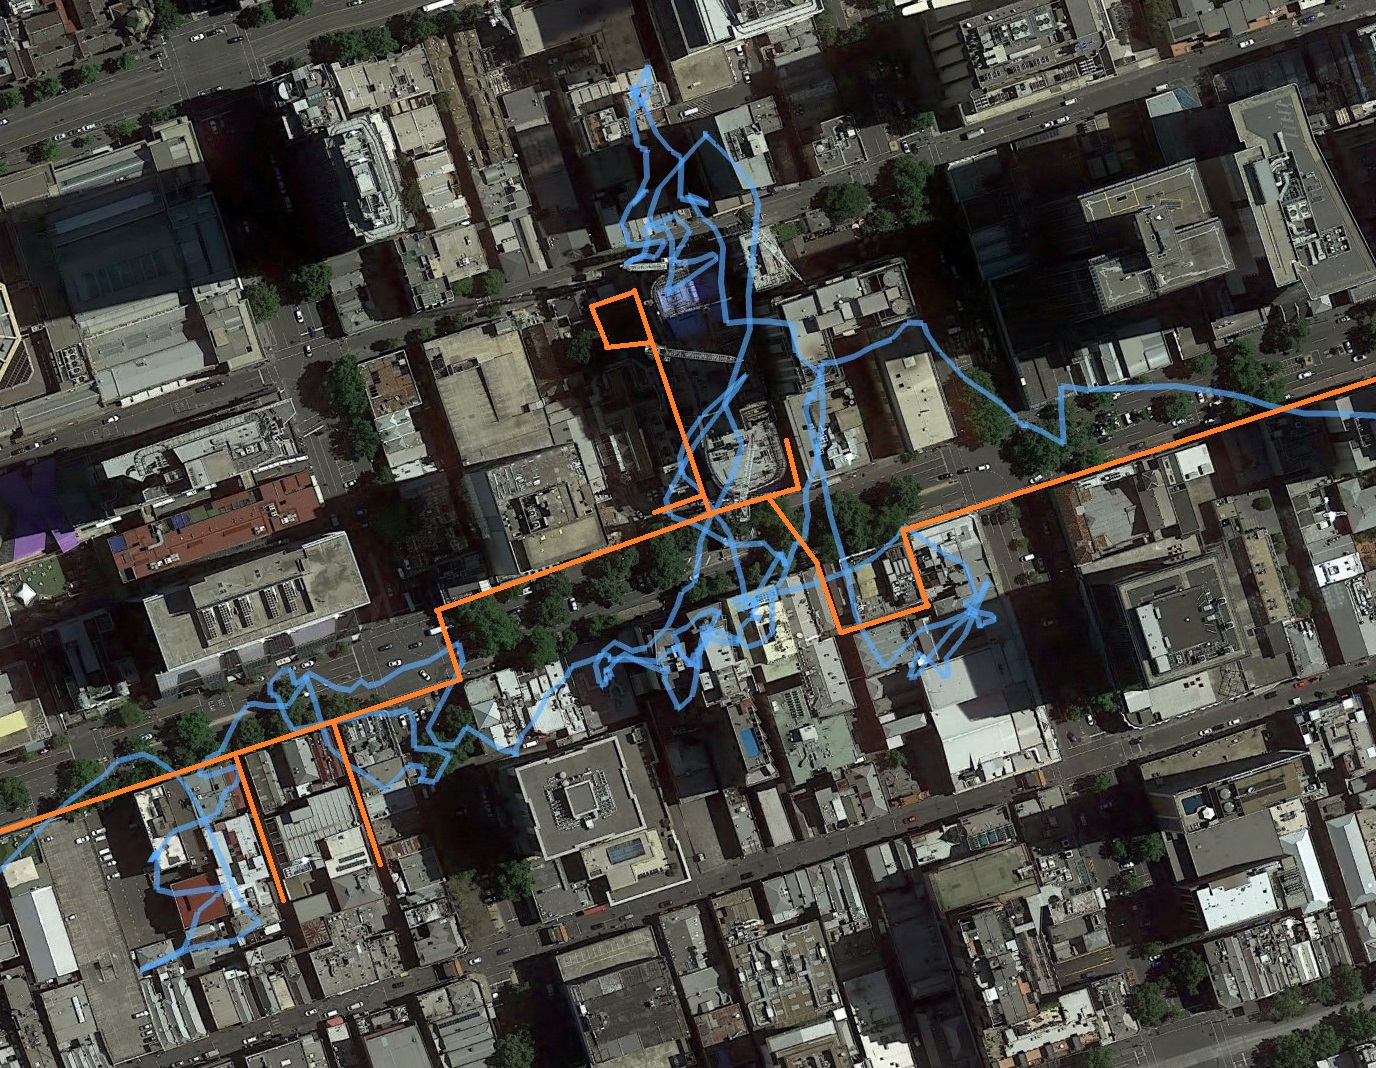
I rarely find errors in the GPS track (mostly in areas with lots of tall office buildings, or long periods indoors) but I still check it at this point by loading the GPS track into Google Earth. This does require an internet connection, but gives a nice overview of the day, possibly highlighting if I missed a location.

The photos should have completed copying, so I locate the photo of the time so I can confirm that the camera time is the same as GPS time. If I am careful when setting the time on the camera it can be within a few seconds of the GPS time, but if more than that I will use exiftool to adjust all the times of the photos so they match the GPS time.

3. Geotag photos

With the photos and tracks on the laptop I now use a command line tool called gpsPhoto.pl for most of my geotagging. This tool doesn’t appear to be maintained anymore, but it works for me. When I run it I specify the directory with GPS tracks, the directory with the photos, and the offset in seconds between the time of the photos and UTC.

4. Check tagged photos

If the GPS track is clean then typically all the photos will be correctly geotagged, but to allow for missing sections or errors in the track I check using another tool, this time a GUI tool called GeoSetter. I believe I can use this instead of gpsPhoto.pl to tag based on GPX files, but my current method works, and it looks like GeoSetter might also no longer be supported…

In GeoSetter I am mainly checking the location of all the photos against the map (fixing if required), and then manually adding location to photos if needed.

5. Import into Lightroom

Up to this point I have been directly updating the metadata of the photos, I want it to be correct at the source. While you can update the time and location in Lightroom, I’m not confident that the original file will be updated, not just in the Lightroom catalogue.

While I say “import” here, I’m not using the Lightroom import functionality. Instead I:

  1. run a script to rename the photos in the ‘incoming’ directory to a date based (the corrected GPS date) directory and filename. eg ‘incoming/IMG0349.CR2′ to ‘lightroom/todo/2019/2019-01-30/20190130T092158101-0349.CR2′
  2. within Lightroom right click on the ‘todo’ folder and use ‘Synchronize Folder…’ to find the new photos

I give the photos a quick check to see that the photos I expect from the day are now included in the Lightroom catalog and nothing is obviously wrong (eg corrupted).

6. Backup

Now that the photos have been added, I exit Lightroom and run a backup. This is nothing special, just robocopy to mirror the Lightroom catalog file and the photos to an external SSD.

7. Clear cards

Once the backup is complete I know that the photos exist in two locations (the internal drive of the laptop as well as the external backup SSD) I can clear the cards ready for the next day. I do this by formatting them in the camera.

8. The first cull

I will try to make at least one pass through the photos from the day using the Pick and Rejected flags in Lightroom. Mostly I will use the Rejected flag on any obviously bad (out of focus, undesired movement) or excessively duplicated (a couple of identical images are ok, but I don’t need a dozen) photos, but I occasionally Pick an image that I will definitely do something with.

Once this first pass is complete I will now delete all the Rejected photos, the CTRL+Backspace shortcut is very handy for this. I have found that I take a lot of photos during the day, and will cull around a third in this first pass…

Further processing

Depending on how long this has taken and the time I have available, I will keep going through the photos, rejecting some more but now starting to play around with some adjustments. While I save the bulk of the post-processing until I get home (on a more powerful computer with a much better screen) it is good to get started on it right away.

In fact I have set myself a goal on this trip to edit and post one image from each day, I’m trying to break my past habit of taking months (or years) to do something with the photos.

Back home

Unfortunately every trip comes to an end, for my workflow that means incorporating all the new photos into my existing library. I don’t try copying them from the laptop directly, instead I ensure that everything is synced to the external SSD, so I plug that into my desktop for the copy.

To simplify merging the two Lightroom catalogs I use the same directory structure for the photos on both computers, so they are copied directly over. I then open my main catalog and import from the copy of the laptop’s catalog. So far this has worked nicely, the photos are now incorporated in the main catalog along with any edits or flags that I made while travelling.

Tagged with: , , ,

Geotagging my photos

Sunday, July 26th, 2009 at 02:05pm

For a long time now I have been using the map within Flickr to locate the photos that I have uploaded.

Since I bought a GPS unit I have taken it on long rides as well as some other journeys to allow me to follow a route and to track where I have been.

In the back of my mind I was aware that you can add GPS information to the EXIF data of images, but it wasn’t until a talk and presentation on geotagging last Tuesday at the camera club that I finally put them together for geotagging.

So, from this point on, I am going to attempt to geotag as many of my photos as I can where the location is appropriate (eg it isn’t for model shots of lego). For photo walks or camera club outings this means that I will have my GPS unit in the top of my camera bag. While for events such as Web Standards Group which is at a fixed location, I will add the location of the venue to the EXIF data instead of just in Flickr.

So how do I actually add the location?

I already use exiftool to sort my images into date based directories and to shift the dates if needed, so one initial thought was to write my own program.

No, first I would see what free programs were available. So over the past few days I have been looking at the first few programs I found: GPicSync, Geotag and PhotoMapper. I also came across gpsPhoto.pl which I will keep in mind if I write my own program as it is in perl, but I’m not looking at a command line tool yet.

  • GPicSync worked, but was slow and didn’t give a preview before writing to the files and generating a KML file
  • Geotag was fast and allowed me to preview before writing to the files. It also allowed me to tweak the time offset of the photos within the program, but I would still prefer to sync the files with GPS time first.
  • PhotoMapper was also fast and it provides a preview using Google Maps within the program before modifying the files. Unfortunately it only appears to support JPG, I also need support for RAW files.

I will keep looking at different programs until I am clear on how to fit geotagging into my workflow and which program will best do that.

Tagged with: ,